Setting up a VPN server using WireGuard on Ubuntu
Applicability: WireGuard is an open source, simple to implement, VPN that is included in recent linux distributions. It utilizes state of the art cryptography to assure that data remains secure during client to server communications. A primary design goal was to minimize code size so as to maximize speed. The designers have attempted to make WireGuard faster and leaner than other VPNs like OpenVPN and IPSec. WireGuard sets up a standard network interface that is much like the eth0 interface so it integrates with any applications that utilize standard network interfaces without additional configuration. Tools such as ifconfig and ip are compatible with WireGuard. WireGuard is cross platform compatible and supports most operating systems and devices. Client Apps are available for most devices like Android and iOS based phones. WireGuard is lightweight enough that you can add it to a server that is running other applications. However, with services like linode offering virtual servers for about $5/month, running on a dedicated server may be the simplest choice.
Required Environment: This guide assumes you are installing WireGuard on a computer that is running Ubuntu revision of 18.04 or later. Versions before 18.04 do not include WireGuard and would require that it be downloaded. It is also assumed that the computer that will host WireGuard has a static IP address.
Server Installation Process: First step is to install WireGuard with the following command:
DKMS will then install the Wireguard module and you should see the following output:
Running module version sanity check.
- Original module
- No original module exists within this kernel
- Installation
- Installing to /lib/modules/4.15.0-43-generic/updates/dkms/
depmod...................
DKMS: install completed.
Setting up wireguard (0.0.20181218-wg1~bionic) ...
Processing triggers for libc-bin (2.27-3ubuntu1) ...
Next you need to generate the private and public key pair for the WireGuard server. The command genkey will save both the private and public keys in your home directory. You can view the keys with "cat privatekey" and "cat publickey". Enter the following on the command line:
wg genkey | tee privatekey | wg pubkey > publickey
Next, you need to create the file /etc/wireguard/wg0.conf and add the contents as shown below. You need to create a separate Peer section for each Client.
Address = 10.0.0.1/24
SaveConfig = true
PostUp = iptables -A FORWARD -i wg0 -j ACCEPT; iptables -t nat -A POSTROUTING -o eth0 -j MASQUERADE; ip6tables -A FORWARD -i wg0 -j ACCEPT; ip6tables -t nat -A POSTROUTING -o eth0 -j MASQUERADE
PostDown = iptables -D FORWARD -i wg0 -j ACCEPT; iptables -t nat -D POSTROUTING -o eth0 -j MASQUERADE; ip6tables -D FORWARD -i wg0 -j ACCEPT; ip6tables -t nat -D POSTROUTING -o eth0 -j MASQUERADE
ListenPort = 51820
PrivateKey = Put the Private Key for the Server Here
[Peer]
PublicKey = Put the Public Key for the Client Here
AllowedIPs = 10.0.0.2/32
[Peer]
PublicKey = Put the Public Key for the Client Here
AllowedIPs = 10.0.0.3/32
- Address is the private address of the WireGuard server
- SaveConfig set to "true" causes the file to automatically update whenever a new peer is added while the service is running. It also makes a record of the client ip and port
- PostUp defines the steps to run when turning the interface on
- PostDown defines the steps to run when turning the interface off
- ListenPort defines the port used for the VPN
- PrivateKey is the private key you generated for the server
- PublicKey is the public key that is generated by the Client device. The instructions for creating the public key are shown below in the Client installation section
- AllowedIPs is the private address of the WireGuard client
Finally, the firewall rules must be set up to allow SSH connections and WireGuard's VPN port conntection. Enter the following:
sudo ufw allow 51820/udp
sudo ufw enable
Verify that port 51820 is no longer blocked with the following command:
If the firewall rules are set up correctly you will see a response similar to the following:

Now it is time to start Wireguard and to enable Wireguard to automatically restart on boot. Input the following two commands:
sudo systemctl enable wg-quick@wg0
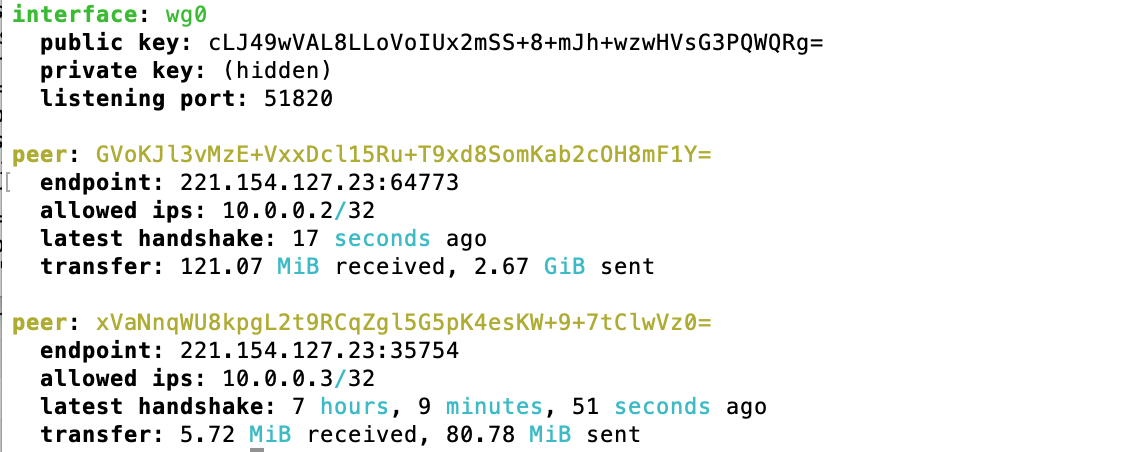
To check that the VPN server is running and ready to connect with clients issue the following two commands and you should see an output after each command that is similar to what is shown below.

If the VPN is to be used as a route to the internet then you will need to enable packet forwarding for IPv4. To enable packet forwarding, edit the file /etc/sysctl.conf and uncomment the net.ipv4.ip_forward=1 line.
Client Installation Process: There are WireGuard clients for most common platforms including android, iOS, Mac OS, and Windows. The basic steps for installing the client software is as follows:
- Download and Install the WireGuard client for each device and operating system. Links to the specific clients for WireGuard can be found at the following link: WireGuard Clients
- Public and Private Keys are generated automatically by the installed client. The Public Key is displayed by the WireGuard Client application. There is also a button on the installed client that will cause the keys to be refreshed if new values are needed. For installing on computers, the instructions for generating the keys are included with the WireGuard installation link instructions.
- Edit the Configuration File as shown in the following example. For WireGuard clients, the Configuration File is shown in the body of the client and you can just copy and paste your changes directly and then save your entries. For installation on computers, you will need to create the wg0.conf file and paste in your changes.
PrivateKey = Put the Private Key for the Client Here. This is populated by the Client Software
Address = 10.0.0.2/32
DNS = 8.8.8.8,8.8.4.4
[Peer]
PublicKey = Put the Public Key for the Server Here
AllowedIPs = 0.0.0.0/0
Endpoint = Put the IP Address and Port for the Server Here. Example: 168.0.0.1:51820
- PrivateKey is the private key of the Client and is normally populated automatically by the Client software.
- Address is the private IP4 address of the Client
- DNS sets the Domain Name Server to be used by WireGuard
- PublicKey is the public key of the Server
- AllowedIPs is the range of IP addresses allowed in the VPN. Setting to 0.0.0.0/0 will allow all addresses.
- Endpoint is the static ip4 address and port number of the server. The formate is ip address:port and the default port for WireGuard is 51820.
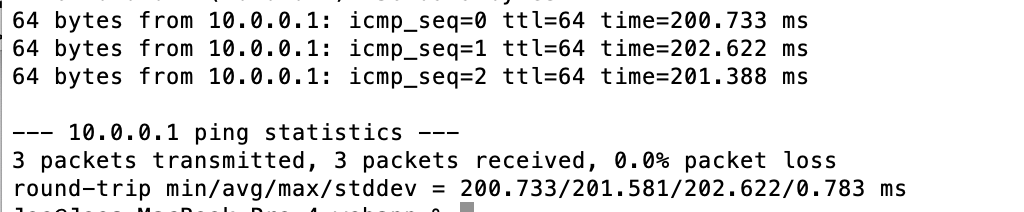
Once all the configuration is completed, pressing activate will start the client and should complete the VPN connection. Now you can test the connection by pinging the server on the private address as shown below and you should get the response as shown (Note: The example VPN connects to a server that is about 11,000 kilometers away from the client):